
Yes folks, this is the last post on the Princess and the Recipe. After two years, I just don't have the time any more, and have decided to focus on other projects.
I've come a long way since I first started the blog. It all started when I was living in Hong Kong and, with a miniscule kitchen and more restaurants than you could shake a stick at, I was eating out more than ever before. I started blogging to keep a record for myself of all the exciting new places I was eating. Soon though, people started to read what I was writing, I got comments and made friends. On my move back to the UK I kept it up, and things got even better as I met other bloggers (in real life!), got together for Dine with Dos Hermanos, disastrous food quizzes and pigouts.
I began to love writing so much that in January of last year I quit my job to study for a journalism diploma. Since then, I have been getting work experience and writing freelance. Slowly but surely, things are coming together, my portfolio of published pieces is growing and I am getting more and more work.
The more I write for a living though, the more the blog suffers. As a lot of you know, blogging takes time, love and effort. For me, it has run its course. I've discovered a whole new career and way of life, plus of course many good friends who I am sure I will still be feasting with on a regular basis. So, thanks for reading, and here's to the next chapter!
Tuesday, March 2, 2010
The End
Sunday, January 10, 2010
Ginger & honey fudge

Yes, I know. It's January. We all should be dieting, exercising or being otherwise virtuous to purge ourselves of our Christmas sins. But when the weather's this cold and wintry, all I want to do is curl up with some sickly-sweet carbs, and this soft and luscious fudge ticks my boxes. If you're on a diet, cut them small and share them with your friends!
Ginger & honey fudge (from Life is Sweet, by Hope & Greenwood)
Ingredients
450g granulated sugar
150ml runny honey
75g unsalted butter
200ml condensed milk
200ml double cream
5 chunks of stem ginger, finely chopped, plus 2tbsp of the syrup
Method
1. Line a 20cm square baking tin with baking parchment.
2. Put the sugar, honey, butter, condensed milk and cream into a large saucepan. Heat it gently, stirring every now and then with a wooden spoon, until all the butter has melted and the sugar has dissolved.
3. Turn up the heat and put your sugar thermometer into the mixture. Stir every now and then to make sure the mixture doesn't burn. Be careful once it gets to 100c!
4. Keep heating slowly until the mixture reaches 115c. Take the pan off the heat and whisk the mixture using an electric whisk (I did mine in the KitchenAid) for 10 minutes.
5. Add the ginger and syrup. Whisk for 10 more minutes until the fudge looks less glossy
6. Pour into the tin. Cut into rough squares once set. The fudge is quite sticky so I wrapped each square in a twist of greaseproof paper to stop them sticking together.
Tuesday, December 8, 2009
Sprout & pomegranate pilaff
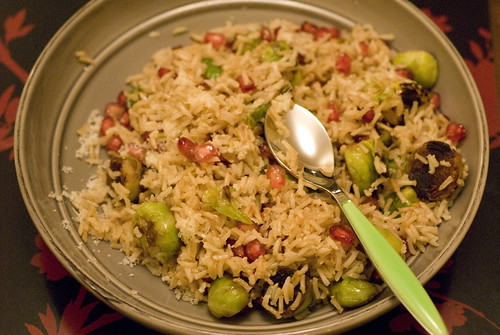
I am not a sprout lover. Over-boiled, cabbagey, dull little bullets are really not my thing, but a bag of them turned up in my vegetable box this week and I was determined to make something tasty with them.
The internet yielded some interesting recipes, all claiming to convert sprout-haters to sprout-o-philes in the blink of an eye. Heidi Swanson's recipe involved both frying and cheese, which seemed like it could be promising. I decided to fry off the sprouts til golden as Heidi does, and then add soy sauce to the hot pan, giving a salty intensity to the earthy veg. I then stirred them through a simple rice pilaff with some pomegranate seeds for juice and colour. A hefty dusting with grated parmesan and I was converted.
Sprout & pomegranate pilaff (serves 1)
Ingredients
12 small sprouts, washed, ends trimmed and any grotty outer leaves removed
1 tbsp olive oil
65ml brown rice, measured in a jug or cup (I like Tilda wholegrain Basmati)
1 tbsp vegetable oil
130ml stock
1 tbsp soy sauce
A handful of pomegranate seeds
Grated parmesan, to taste
Method
1. Halve the sprouts and toss in the olive oil.
2. Heat the vegetable oil in a large saucepan. When hot, add the rice and stir around until you start to hear it pop.
3. Add the stock to the rice. Bring up to a simmer, cover the saucepan with a teatowel and then the lid. Cook for 15mins without opening the lid to peek! If lots of steam is coming out, turn the heat down.
4. Heat a frying pan and when hot, add the oiled sprout halves to the pan, flat side down. Put a lid over the frying pan so that the sprouts steam in their own juices for around 5 minutses.
5. Once the sprouts are steamed, take the lid off the frying pan and stir them around to get some browned crispiness on the rounded sides too. Splash over the soy sauce. Leave to rest in the hot pan until the rice is cooked.
6. Stir the sprouts and pomegranate seeds through the rice. Season and add parmesan.
It also occurred to me that this might be nice with walnuts or toasted pine nuts sprinkled through. Who knew sprouts could be so tasty? Sign me up to Sprout-a-holics Anonymous!
Thursday, December 3, 2009
How to make the perfect meringue
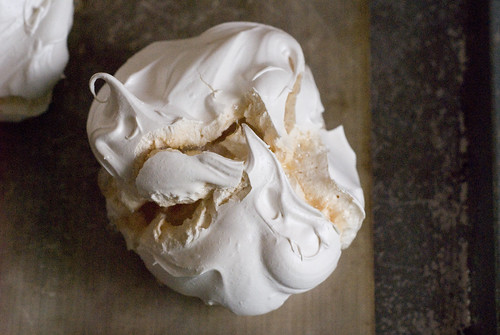
What makes a perfect meringue? In my view, it's a light crispy shell leading to a chewy, teeth-sticking interior. If it can look pretty too, then that's a bonus. Meringues are great for pavlovas, or just to ladle fruit over, and are the perfect way to use up any left over egg whites that you might have hanging around after making custard or mayonnaise from the yolks.
Meringues are not difficult to make and these home made beauties knock spots off those miserable little nests that you get from the supermarket. Here are my top three tips for getting perfect meringues.
1. Weigh your egg whites. Eggs are all different sizes so it's best to go by weight rather than number.
2. Leave the oven door ajar. With electric ovens, moisture can build up inside and stop your meringues from drying out beautifully. Bea (from Bea's of Bloomsbury) says the best way to get a professional finish at home is to wedge your oven door ajar with a wooden spoon.
3. Give it time. The best meringues are cooked long and slow, on a low heat.
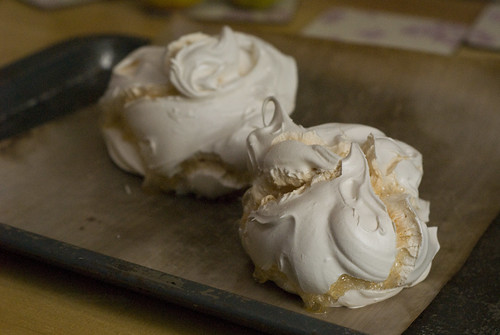
Meringues (makes two large meringues)
I go by the Ottolenghi method of heating the sugar in the oven first. It's easy to scale this recipe up or down as required, just weigh your egg whites and use double the amount of caster sugar. Some people like to add vinegar or cornflour, but I don't find it necessary.
Ingredients
60g egg whites (approx 2 egg whites)
120g caster sugar
1. Preheat the oven to 200c.
2. Line a baking tray with baking parchment and spread the sugar evenly on it.
3. Put the sugar in the oven for 7-8 minutes, until it just starts to melt around the edges.
4. When the sugar is almost ready, put the egg whites into a food mixer and whisk until they start to get frothy.
5. Slowly add the hot sugar to the egg whites. Put the mixer speed to the max and let it whisk until cool. This takes about 10 minutes and when it's ready the mixture should hold stiff peaks. Meanwhile, turn the oven down to 110c.
6. Shape the semi-cooked meringues into large balls on another tray lined with baking parchment. I did this with two large spoons.
7. Pop into the oven for 2 hours.
This is the recipe for a plain meringue, but why stop there? You could swirl in a fruit coulis before baking, roll the meringues in crushed nuts or stir in some rosewater. These meringues will last a couple of days in an airtight container.
Wednesday, December 2, 2009
Cooking live at the Good Food Show
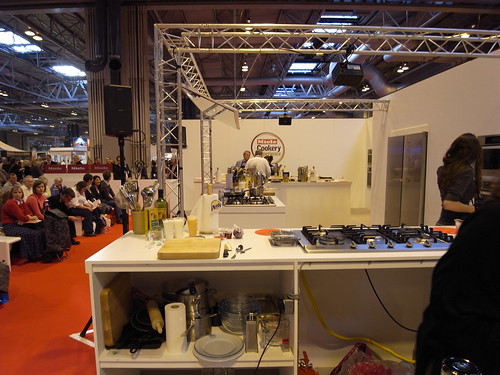
The view from the stage
I trekked up to Birmingham for the Good Food Show last week, and spent the morning navigating the hungry hordes before having a delicious three course VIP lunch with the Miele crowd. After a quick meet and greet with the Hairy Bikers, we were whisked off for a cookery experience with Mark Lloyd, head chef at The Cleave Inn. What Miele had neglected to tell us was that the "experience" would be on stage in front of a live audience! We put on our best smiles and headed for the stage.

We cooked a delicious venision toad (or should that be bambi?) in the hole,with chilli onion jam and steamed broccoli. It was a great opportunity to try out the Miele kit and razor sharp Kin knives. We then sat down to lunch number two. Gastrogeek and I began to wish we hadn't tucked in quite so greedily to dessert earlier...
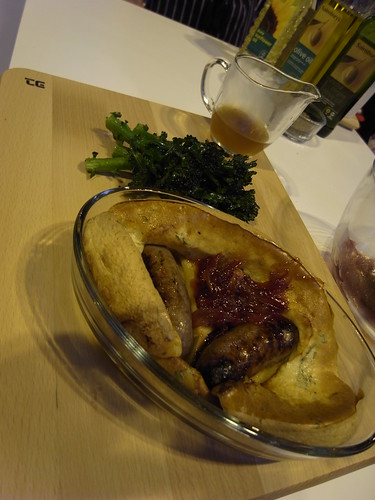
The finished product
If you want to try one of Miele's cookery experiences for yourself, they have very generously donated two tickets to the Blaggers' Banquet auction, so get over there and get bidding!
Finally, we were treated to one of Gordon Ramsay's performances in the Supertheatre, full of the usual bravado and a rather tasty looking butterscotch & apple dessert made by Mark Sargeant. This time two years ago I was telling you about Tearamisu inspired by Gordon at the GFS.
Then it was just a last round of the show stalls before making the drive home. Best buy of the day was Sheep Dip whisky from The Spencerfield Spirit Company. I was originally tempted to the stand by their Pig's Nose whisky, but was persuaded by the lovely Alex Nichol that my hubby would probably prefer Sheep Dip, given his taste for the peatier end of the scale. The name comes from the sheep dip barrels that farmers used to hide their moonshine whisky in.
All in all, a great day out, although do try to go on a weekday as even on a Thursday the ravenous crowds were heaving!
Tuesday, December 1, 2009
Hot Boozy Chocolate - domestic sluttery guest post

I am a huge Domestic Sluttery fan, so when they asked me for a guest post I couldn't resist. Especially as it gave me the chance to develop (or should I say devour) a deliciously boozy hot choco-cocktail!
Wednesday, November 18, 2009
Blaggers Banquet - prep talk

The blogosphere has been buzzing with Blaggers' Banquet talk lately. In case you missed it, last Sunday 50 food and wine bloggers took over Hawksmoor restaurant in London in a huge charity blogging event. We blagged and blagged til our slippery tongues could blag no more. All the ingredients for the dinner, the wine, the goodie bags and a fantastic selection of auction prizes were blagged from our PR contacts. We then sold tickets, all in aid of Action Against Hunger.


After a couple of weeks gathering support from our very generous contacts, the big day finally came. I arrived bright and early at Hawksmoor, to find the place full - of food, bloggers and wine. Vegetables and fruit needed sorting, the menu needed last minute tweaks to accommodate ingredients we thought we had, goody bags needed stuffing and auction prizes sorting.
The vegetable spread from Riverford was particularly impressive, if muddy, and I spent part of the morning dicing with death (or at least nicked fingers) making parsnip crisps on the mandoline.
Goody bags were very good indeed - absolutely packed with treats generously provided by our PR pals.
Lizzie (or @Hollowlegs) and I will be forever after known as the Greasy Gougeres Girls, after a slightly disturbing and slippery encounter with a choux-filled cheesy pastry bag.


Denise and Billy kept a close eye (or should that be nose?) on the wine.

I was gutted to have to go home before the event really kicked off, but from the photos (all taken by @Foodbymark), I can rest safe in the thought that the diners all had a great time.
The fun doesn't stop there though. Our auction, with some truly fantastic prizes like tasting menus, chocolate tastings and more, is currently running on Ebay and more prizes will be drip-fed as the weeks go on. The perfect place for a foodie friend's Christmas present, or maybe just a treat for yourself!
